WordPress教學
如何在WooCommerce註冊表單添加姓名等字段
首先,請確保在帳戶登錄頁面上啟用了WooCommerce註冊表單。為此,請轉到WooCommerce>設置>帳戶,然後在“我的帳戶”頁面上選中啟用客戶註冊。
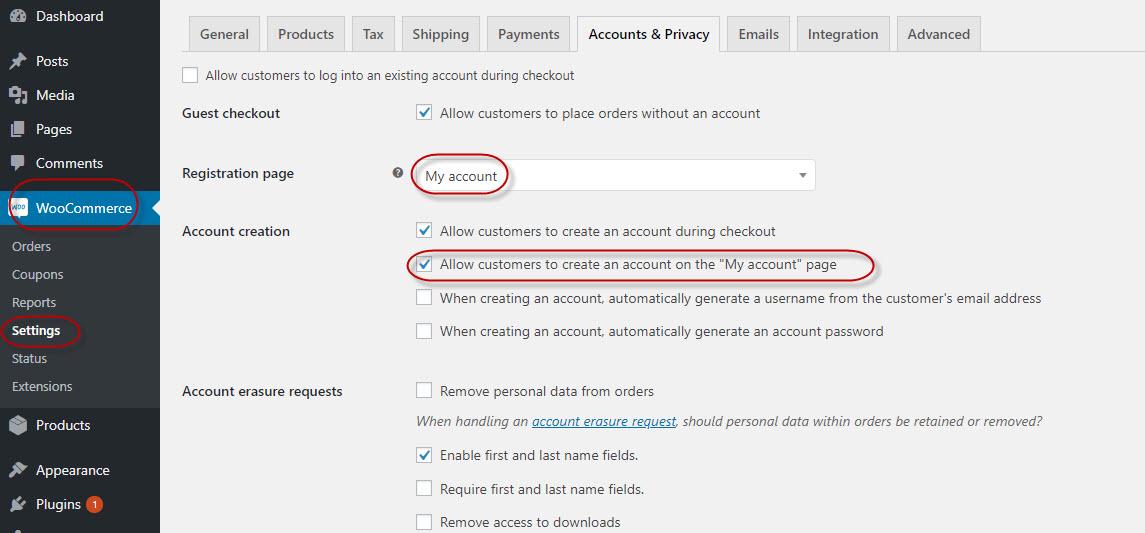
啟用此選項後,您可以在前端看到WooCommerce註冊表單。
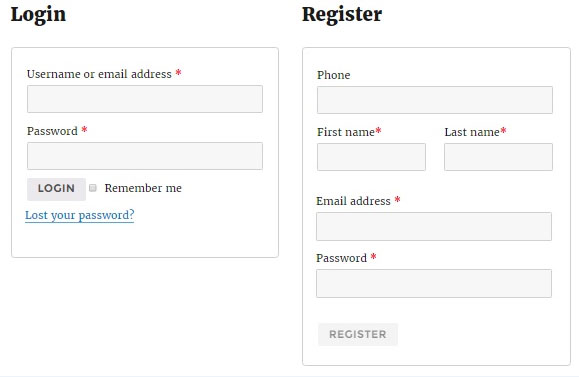
顯而易見,這是一個非常適中的WooCommerce表單,但是,我們可以通過以下操作向此結構添加更多字段。當前,要包括額外的字段(例如名字,姓氏和電話號碼等),請在位於您的主題文件夾中的functions.php末尾包含以下代碼行。
function wooc_extra_register_fields() {?>
       <p class="form-row form-row-wide">
       <label for="reg_billing_phone"><?php _e( 'Phone', 'woocommerce' ); ?></label>
       <input type="text" class="input-text" name="billing_phone" id="reg_billing_phone" value="<?php esc_attr_e( $_POST['billing_phone'] ); ?>" />
       </p>
       <p class="form-row form-row-first">
       <label for="reg_billing_first_name"><?php _e( 'First name', 'woocommerce' ); ?><span class="required">*</span></label>
       <input type="text" class="input-text" name="billing_first_name" id="reg_billing_first_name" value="<?php if ( ! empty( $_POST['billing_first_name'] ) ) esc_attr_e( $_POST['billing_first_name'] ); ?>" />
       </p>
       <p class="form-row form-row-last">
       <label for="reg_billing_last_name"><?php _e( 'Last name', 'woocommerce' ); ?><span class="required">*</span></label>
       <input type="text" class="input-text" name="billing_last_name" id="reg_billing_last_name" value="<?php if ( ! empty( $_POST['billing_last_name'] ) ) esc_attr_e( $_POST['billing_last_name'] ); ?>" />
       </p>
       <div class="clear"></div>
       <?php
 }
 add_action( 'woocommerce_register_form_start', 'wooc_extra_register_fields' );
現在,如果刷新頁面,您將看到字段已添加到WooCommerce註冊表單中。
要將這些註冊表單字段與賬單地址相關聯,您必須在字段名稱之前添加前綴“ billing_”。以下是所有有效的WooCommerce表單字段的列表,這些字段可以添加到註冊表單中,並且可以與帳單地址相關聯。
- billing_first_name
- billing_last_name
- billing_company
- billing_address_1
- billing_address_2
- billing_city
- billing_postcode
- billing_country
- billing_state
- billing_email
- billing_phone
現在,我們還需要驗證這些新添加的表單字段。要驗證這些結構字段,請在位於主題文件夾中的functions.php文件末尾加入以下代碼。
/**
* register fields Validating.
*/
function wooc_validate_extra_register_fields( $username, $email, $validation_errors ) {
      if ( isset( $_POST['billing_first_name'] ) && empty( $_POST['billing_first_name'] ) ) {
             $validation_errors->add( 'billing_first_name_error', __( '<strong>Error</strong>: First name is required!', 'woocommerce' ) );
      }
      if ( isset( $_POST['billing_last_name'] ) && empty( $_POST['billing_last_name'] ) ) {
             $validation_errors->add( 'billing_last_name_error', __( '<strong>Error</strong>: Last name is required!.', 'woocommerce' ) );
      }
         return $validation_errors;
}
add_action( 'woocommerce_register_post', 'wooc_validate_extra_register_fields', 10, 3 );
這個代碼是當欄位未輸入時顯示提示。
同樣,您可以包括各種驗證規則,也可以將驗證規則添加到不同的字段。您可以看到正在應用我們的自定義驗證規則之一:
最後,我們需要將這些值保存到數據庫中。
要在數據庫中插入值,請在主題的functions.php文件中添加以下代碼:
/**
* Below code save extra fields.
*/
function wooc_save_extra_register_fields( $customer_id ) {
    if ( isset( $_POST['billing_phone'] ) ) {
                 // Phone input filed which is used in WooCommerce
                 update_user_meta( $customer_id, 'billing_phone', sanitize_text_field( $_POST['billing_phone'] ) );
          }
      if ( isset( $_POST['billing_first_name'] ) ) {
             //First name field which is by default
             update_user_meta( $customer_id, 'first_name', sanitize_text_field( $_POST['billing_first_name'] ) );
             // First name field which is used in WooCommerce
             update_user_meta( $customer_id, 'billing_first_name', sanitize_text_field( $_POST['billing_first_name'] ) );
      }
      if ( isset( $_POST['billing_last_name'] ) ) {
             // Last name field which is by default
             update_user_meta( $customer_id, 'last_name', sanitize_text_field( $_POST['billing_last_name'] ) );
             // Last name field which is used in WooCommerce
             update_user_meta( $customer_id, 'billing_last_name', sanitize_text_field( $_POST['billing_last_name'] ) );
      }
}
add_action( 'woocommerce_created_customer', 'wooc_save_extra_register_fields' );
我們在這裡完成了!現在,已添加,驗證和插入了最近添加的字段,以供將來使用。
在您帳戶的帳單郵寄地址頁面上,您需要點擊修改才能轉到該地址。您可以從已填寫的註冊表中看到值。
WooCommerce編輯我的帳戶頁面-另一種方法
如果希望使用其他方法註冊WoOCommerce表單字段,則可以使用WooCommerce掛鉤編輯WooCommerce我的帳戶頁面。
function woocommerce_edit_my_account_page() {
    return apply_filters( 'woocommerce_forms_field', array(
        'woocommerce_my_account_page' => array(
            'type'        => 'text',
            'label'       => __( 'Socail Media Profile Link', ' cloudways' ),
            'placeholder' => __( 'Profile Link', 'cloudways' ),
            'required'    => false,
        ),
    ) );
}
function edit_my_account_page_woocommerce() {
    $fields = woocommerce_edit_my_account_page();
    foreach ( $fields as $key => $field_args ) {
        woocommerce_form_field( $key, $field_args );
    }
}
add_action( 'woocommerce_register_form', 'edit_my_account_page_woocommerce', 15 );
代碼段的結果如下所示:
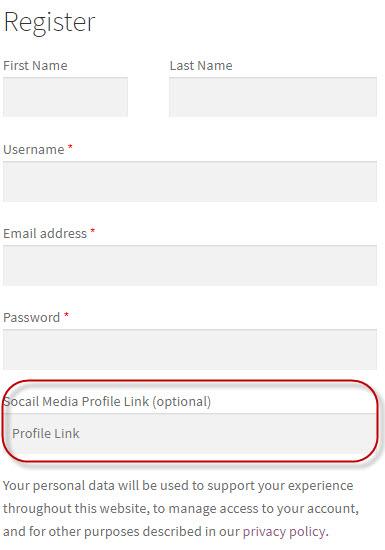
上面的代碼段以woocommerce_edit_my_account_page()開始,該代碼段的後半部分使用該代碼。此函數返回一個多維數組,該數組包含有關您要添加到表單中的字段(類型,標籤,佔位符,是否為必填)的信息。
為了確保可以進一步更新字段的值,將通過woocommerce_form_field()函數對數組進行進一步處理。
在代碼片段的下半部分,我使用了edit_my_account_page_woocommerce()函數。如您所見,$ fields變量包含woocommerce_edit_my_account_page()函數生成的數組。這通過使用foreach()循環進行循環。
添加所需的WooCommerce表單字段
如您所見,上面提到的代碼片段非常靈活,您可以通過在$ fields數組中提供適當的字段結構值來添加所需的任何字段類型。